

Using the Menu Block
Description
The Menu block adds a row of links to your email, for example "Recipes · Events · Shop". Each item of the menu is a link.
This article gives two step-by-step procedures:
- A. A menu with links to web pages.
- B. A menu with links to sections of the same email.
Why It's Important
A menu helps readers find what interests them in a long newsletter. It also gives them a quick way to go to the main pages of your website. A clear menu at the top of the email increases clicks and makes long emails easier to read.
A. Create a Menu with Links to Web Pages
-
Add a Menu block
- In the email designer, open the Content tab.
- Drag the Menu block to the place where you want the menu, usually at the top of the email.
- Select the block. Its settings open on the right, in the Menu properties panel.
-
Add the menu items
- Under Configure menu items, click Add new item once for each item, for example "Shop", "Blog" and "Contact".
- To change the order, drag an item by its handle (the icon with horizontal lines, on the left of the item).
- To remove an item, click Delete on that item.
-
Set the link of each item
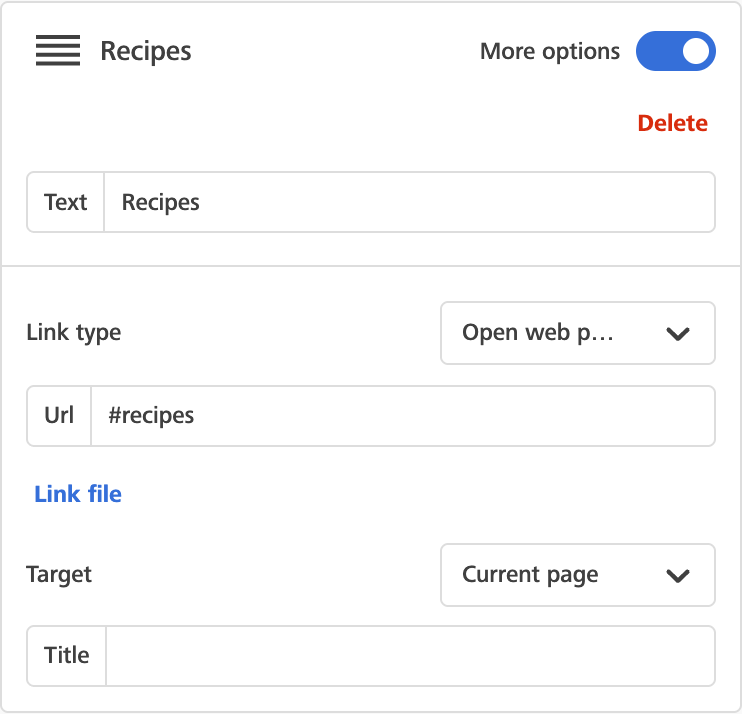
- In the Text field, type the word that the reader sees, for example "Shop".
- Turn on More options. The link settings appear.
- In Link type, keep Open web page. The other choices are Send email, Make call and Send SMS; this article covers only Open web page.
- In the URL field (label in the editor: "Url"), type the full web address, for example
https://www.example.com/shop. - In Target, keep Current page. This field only sets where the link opens; New page opens a new browser tab.
- The Title field is optional. Its text shows when the reader moves the mouse over the item.
- To link to a file instead of a web page, click Link file. It opens the File manager, where you can upload a file or pick one, for example a PDF.
-
Save and test
- Save your email.
- Send a test email to yourself and click each item of the menu.
B. Create a Menu with Links to Sections of the Same Email
Use this menu in a long newsletter, so that readers can jump to a section.
Gmail (on the web and in the app) does not support links to a section of the same email: the link does nothing. They work in most other email apps, such as Apple Mail and Outlook. If many of your subscribers use Gmail, use a menu with links to web pages instead.
-
Add a destination marker above each section
- Above each section, add an HTML block with an empty
<a>tag that has anid. For example, add<a id="recipes"></a>above the "Recipes" section and<a id="events"></a>above the "Events" section. - The detailed steps are in Adding Anchor Links to Email Content with HTML.
- Above each section, add an HTML block with an empty
-
Add a Menu block and its items
- Drag the Menu block to the top of the email and select it.
- Under Configure menu items, click Add new item once for each section, for example "Recipes" and "Events".
-
Set the link of each item
- In the Text field, type the word that the reader sees, for example "Recipes".
- Turn on More options.
- In Link type, keep Open web page. This is the right choice for a section of the same email too; you do not need to create a web address.
- In the URL field (label in the editor: "Url"), type
#followed by theidof the marker, for example#recipes. - In Target, keep Current page. This field does not choose the section; the address in the URL field does.
-
Save and test
- Save your email.
- Send a test email to yourself and click each item of the menu to make sure it goes to the correct section.
The name after # must be exactly the same as the id of the marker, with no spaces and no accents. For example, #events goes to <a id="events"></a>, but #Events or #évents do not.
Formatting the Menu
The settings below the items apply to the whole menu:
- Font family, Font weight and Font size: the font of the items.
- Text color and Link color: the colors of the items.
- Align: the position of the menu (left, center or right).
- Letter spacing: the space between the letters.
- Layout: Horizontal (items side by side) or Vertical (items one below the other).
- Separator: a character shown between the items, for example
|. - Mobile menu: on mobile devices, groups the items behind a menu icon.
- Items padding: the space around each item.
Troubleshooting
The link does not go to the section
- Make sure that the name after
#in the URL field is exactly the same as theidof the marker, including upper and lower case. - Make sure that the marker is an empty
<a>tag with anid, in an HTML block. Do not use thenameattribute, and do not use a<div>. - Gmail (on the web and in the app) does not support links to a section of the same email. Test in the email apps that your audience uses most.
The link opens an empty or new tab
- Check the Target field of the item. Choose Current page.
Related Articles
- Using the Email Designer - Blocks and settings of the designer
- Adding Anchor Links to Email Content with HTML - Destination markers for sections
- Uploading to the File Manager - Files you can link to
- Testing Your Campaign - Test links before sending