

Creating a Form
Plan availability
Your free plan includes one form. The Growth and Premium plans include unlimited forms. Interests and tags require Growth or above.
Why this matters
Forms turn visitors into subscribers. A clear, well-built form makes it easy for people to sign up while letting you collect exactly the information you need, so you can segment and target your audience from the very first contact.
Make it warm and inviting
People subscribe when they know what they're getting. A few friendly, marketing-minded touches go a long way:
- Say what they're signing up for and how often they'll hear from you (for example, a monthly recipe newsletter).
- Explain the value: what's in it for them.
- Use inviting button copy like Sign me up or Join the list instead of a plain Submit.
Before you start: prepare your list
A form can only offer fields that already exist on the list it feeds, and your interests must be visible. Set this up first:
-
Go to Audience ▸ Contacts and open the list you'll use.
-
Add the attributes, interests, and tags you want to collect.
-
Make your interests visible. Only visible interests appear in the form builder's Available fields.
-
Making an interest visible also lets you set a display name. Write it clearly and correctly: it's used as-is in your form, and reusing the same display name keeps your wording consistent everywhere, across the sign-up form and on the preference center page.
One list per form
A form is linked to a single list when it's created, and every submission is stored in that list. Decide which list the form feeds before you build it.
Create the form and link it to a list
-
In the left menu, go to Audience Building ▸ Forms.
-
Create a new form and assign it to a list (this can't be changed later).
-
Give it a clear name (for example, Newsletter sign-up) and confirm.
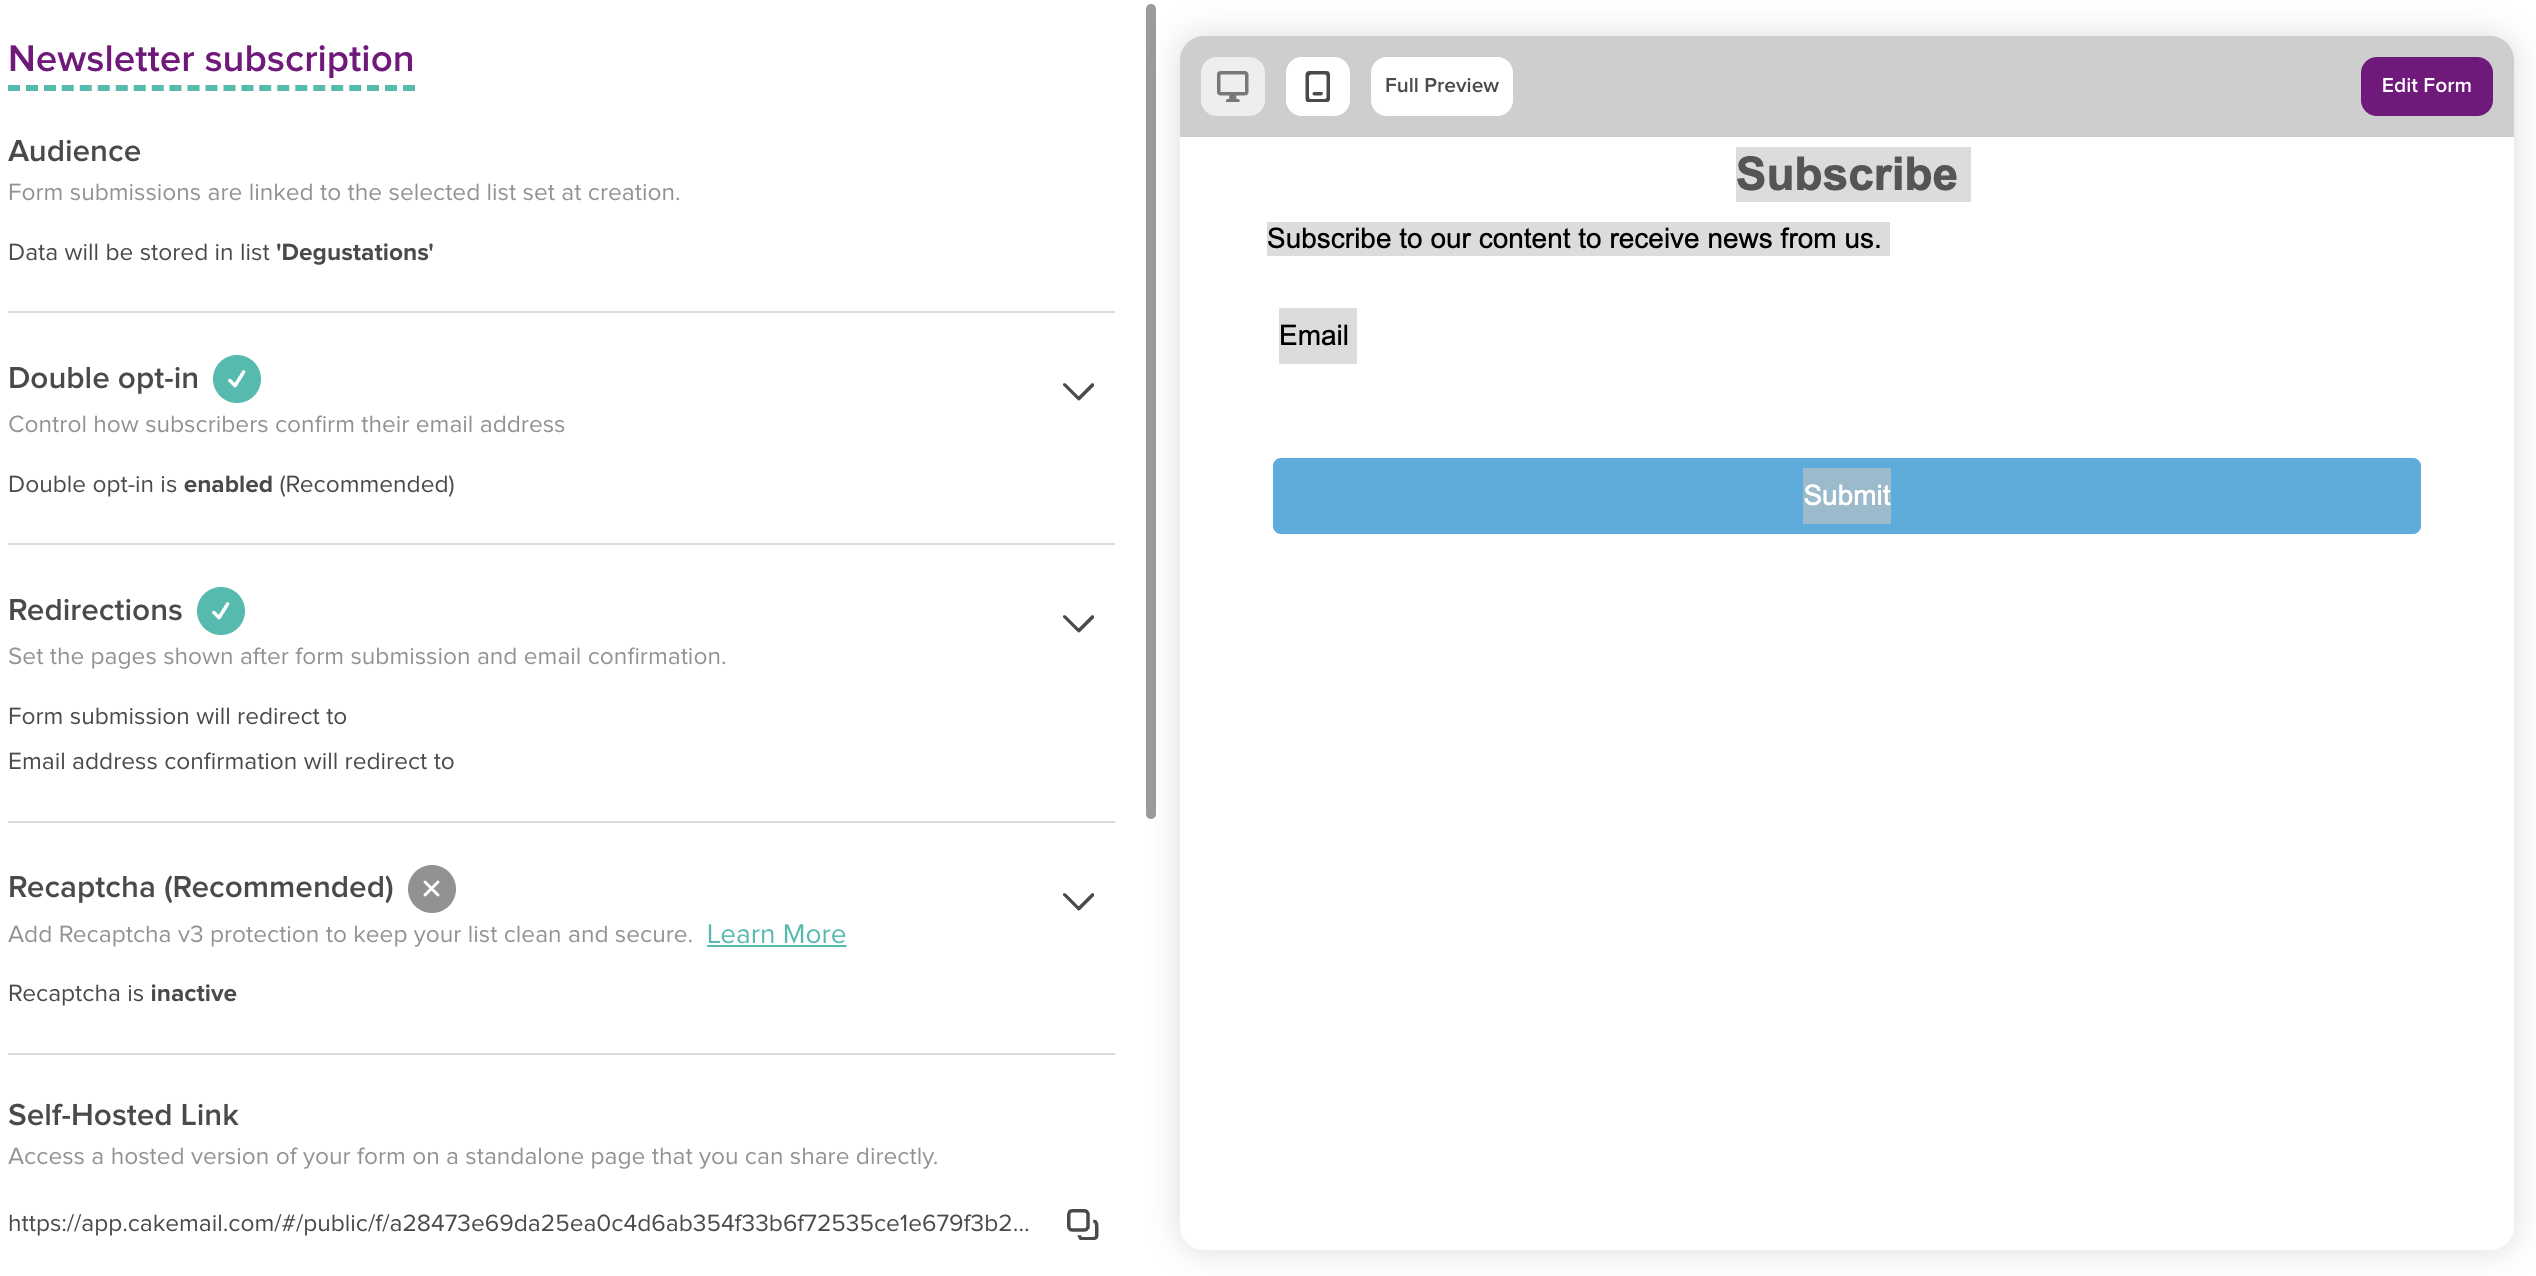
You land on the form's page, which has two areas: the settings on the left and a live preview with Edit Form on the right.
Configure the form settings
On the form's page, set how the form behaves:
- Audience: the list submissions are stored in (set at creation, shown for reference).
- Double opt-in (recommended): subscribers confirm their email before being added. It's the strongest proof of consent and blocks bots and bad sign-ups. Keep it on.
- Redirections: the pages shown after submission and after email confirmation. Default pages are provided; if you've set up your brand, they already match it. You can also point each step to your own URL.
- Recaptcha (recommended): reCAPTCHA protection against bots. It needs a Google reCAPTCHA account. See Configuring reCAPTCHA on your forms.
Build and brand the form
Click Edit Form to open the designer, then:
- Add content: drag blocks (Title, Paragraph, Image, and so on) onto the page and remove anything you don't need. Keep it focused: one clear action, no distractions.
- Apply your branding: turn on Smart branding (using the little arrow at the top) to apply your brand colors and logo automatically.
Smart branding overrides manual colors
With Smart branding on, colors and logo come from your brand settings. Any color or logo change you make by hand in the editor won't be saved; it resets to your brand defaults. Check the branded result in Full Preview, not in the editor.
Add and configure the fields
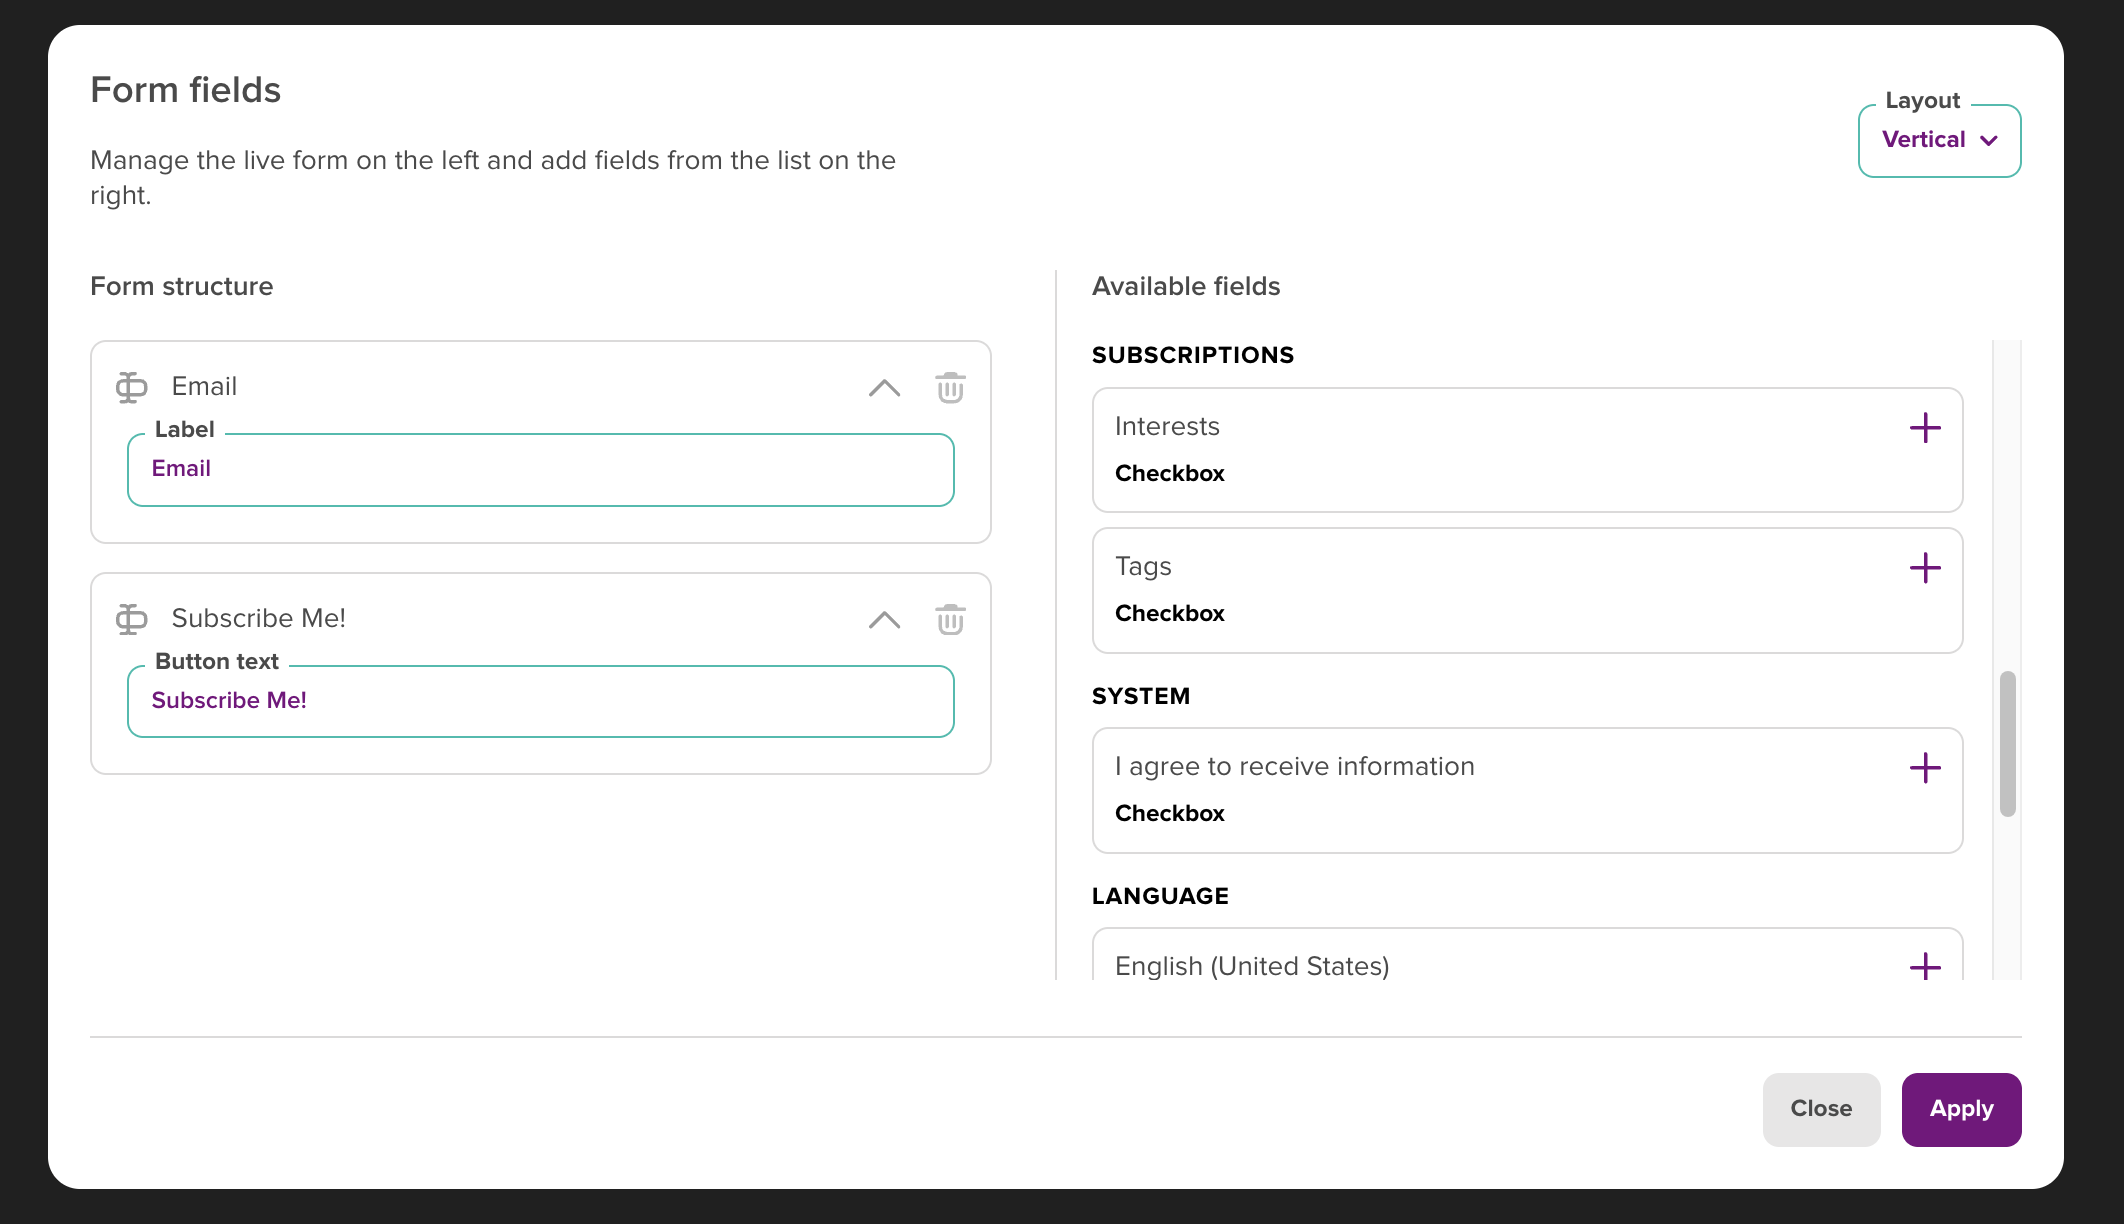
Select the Form block, then click Edit form fields to open the Form fields panel. It has two sides:
- Form structure (left): the fields currently on your form.
- Available fields (right): the attributes, interests, and tags from your list that you can add to the form.
Email and Submit are always there
The Email field and the Submit button can't be removed. Click Email to set a friendlier label (e.g. Enter your email address here), and rename Submit to something motivating, like Join the list.
Add a field by picking it from Available fields, and remove fields from Form structure.
Added an interest or tag after publishing?
A new interest or tag is added to your form automatically once it's set to visible on the list. If it doesn't show up:
- Reopen the form.
- Save and Publish again.
- Confirm the field now appears in the form.
Configure a single field
Expand any field to set its options:
- Type: Text, Dropdown, Checkbox, Radio, and more.
- Label: the text shown to subscribers. Edit this freely.
- Placeholder: the hint shown inside an empty field (e.g. Pick your interests).
- Options (for choice fields): click Add option to pull in the values from your list. Each option has a Label and a Value.
- Layout: Horizontal or Vertical for the options.
- Required: whether the field must be completed. It works on single fields (Email, a permission checkbox, a single-choice dropdown or radio), but can't force a selection on a multi-select checkbox field like interests.
Never change a field or option Value (key)
The Label is what people see, so change it freely. The Value is the key written to your database. If you change or lose a key, submissions won't be recorded against the right attribute or interest. Only edit the Label (left side); leave the Value alone.
Choosing a field type for interests and tags:
- Use Checkbox when people can pick several options (recommended for interests).
- Use Dropdown or Radio when only one choice applies.
Add a permission checkbox
Add an I agree to receive information checkbox and set it to Required. Submitting already implies consent, but an explicit checkbox strengthens your permission record.
Reorder the fields
To change the order of your fields, go to the Manage Fields section in the Form block properties, then drag each field by its handle into the order you want.
Style the fields
Styling is set for the whole form, not per field: every field shares the same font, colors, and spacing (unless Smart branding is driving them). In the Form block properties:
- Label options: text color, alignment, position.
- Field options: text and background color, border, border radius, and active field outline color. Giving fields a visible border color helps people see where to type.
- Button options: the Submit button's colors, alignment, and shape.
Publish and test
-
Click Save, then close the editor.
-
Click Publish. A form only goes live once it's published. Use the desktop/mobile preview (or Full Preview) to confirm your branding applied.
-
Copy the Self-Hosted Link and run the full flow yourself: submit the form, receive the confirmation email, then click the confirmation button.
-
Open the list in Audience ▸ Contacts and confirm the contact was added and every attribute, interest, and tag landed in the right place.
Republish after every change
Any later edit (fields, design, or settings) only goes live when you click Publish again. Make republishing a habit.
Publishing and embedding
Once published, you have several ways to use the form:
- Self-Hosted Link: a hosted page for your form on its own URL. Great for testing, or for sharing directly (for example, on a tablet at an event).
- Dynamic Embed Snippet (recommended): a script that hosts the form on your website and updates automatically every time you publish.
- Static HTML Code (for developers): a static version you can modify yourself; it does not update automatically.
- Submission URL (for developers): an endpoint for submitting the form from a custom integration.
For a polished, on-brand result, embed the form on your site with the Dynamic Embed Snippet or Static HTML Code rather than only sharing the Self-Hosted Link.
Keep it effective
- Ask for less. The more fields you require, the fewer people complete the form. Collect only what you'll use.
- Segment deliberately. Interests or tags are great for segmentation. Ideally pick one of the two, and keep the number of options small on large lists.
Troubleshooting
My interests, tags, or attributes aren't in Available fields
- Interests must be created on the list and set to visible; hidden interests don't appear.
- Interests and tags require a Growth account or above.
- A field added after publishing only appears once you reopen the form and Publish again.
Submissions aren't recorded against the right field
- A field or option Value (key) was changed. Keys must stay exactly as generated; only edit labels.
"Required" isn't forcing a choice on interests
- This is expected. Required works on single fields (Email, a permission checkbox, a single-choice dropdown or radio). It can't force a selection on a multi-select checkbox field, so it won't make subscribers pick at least one interest.
My changes aren't showing
- Click Publish. Changes only go live after publishing. The Dynamic Embed Snippet updates automatically; Static HTML Code does not.
My brand colors aren't showing in the editor
- Smart branding renders in Full Preview, not in the editor canvas.
Related articles
- Configuring reCAPTCHA on your forms - Protect your form from bots
- Customizing subscription redirection pages - Set the post-submit and post-confirmation pages
- Configuring opt-in emails - Tune the confirmation email
- Adding attributes to your list - Create the fields your form collects
- Creating landing pages - Build pages with forms