

Authenticating Your Domain
Why this matters
Inbox providers like Gmail, Outlook, and Yahoo check whether an email that claims to come from your domain really did. Gmail and Yahoo now require senders to authenticate their domain. If you don't, your emails are likely to land in spam or be rejected.
Authenticating your domain does two things:
- It proves to inbox providers that you are a legitimate sender, which improves your delivery.
- It protects your domain from spoofing (someone pretending to send as you).
The good news: The platform generates the exact DNS record for you. You only need to copy it into your domain's DNS once.
You can only authenticate a domain you own
Authentication works only for a private domain that you control (for example yourcompany.com). You cannot authenticate a public webmail domain like gmail.com, yahoo.com, outlook.com, or hotmail.com, because you don't own them and can't change their DNS.
Private domains vs public domains
Understanding this distinction is the key to authentication.
Private domain (this is what you authenticate): a domain you own and control, like yourcompany.com. Because you manage its DNS settings, you can add the authentication records (DKIM, DMARC) that prove your emails really come from you. This is the kind of domain you authenticate here, and the kind you should send from (for example news@yourcompany.com).
Public domain (you cannot authenticate it): the shared domains of free email and webmail providers, such as gmail.com, yahoo.com, outlook.com, hotmail.com, or icloud.com. Millions of people use these addresses, but no single user owns or controls the domain, so you can't add DNS records to it or authenticate it. Sending marketing email "from" a public address (like yourname@gmail.com) is now blocked or filtered by Gmail and Yahoo's sender rules, and it badly hurts your deliverability.
What to do: always send from an address on your own domain, and authenticate that domain (steps below). If you only have a free address today, register a domain (it is inexpensive) and create a mailbox on it, then come back to authenticate it.
Before you start
You'll need access to your domain's DNS settings, which usually live with your domain registrar or hosting provider (for example GoDaddy, Cloudflare, or OVH).
Not sure who manages your DNS? Ask whoever set up your website or email. You can also use Copy instructions (in the steps below) to send everything to your IT or web team.
Authenticate your domain
-
In the left menu, go to Settings ▸ Domains.
-
In Sender Domains, find your sending domain. If it shows Unauthenticated (a yellow badge), click Authenticate Domain. (Don't see your domain yet? Click Create Sender and Domain first, then come back to this step.)
-
Configure your DNS. On the first step of the wizard, open your domain provider in a new tab, or click Copy instructions to send the full setup to your IT/web team.
-
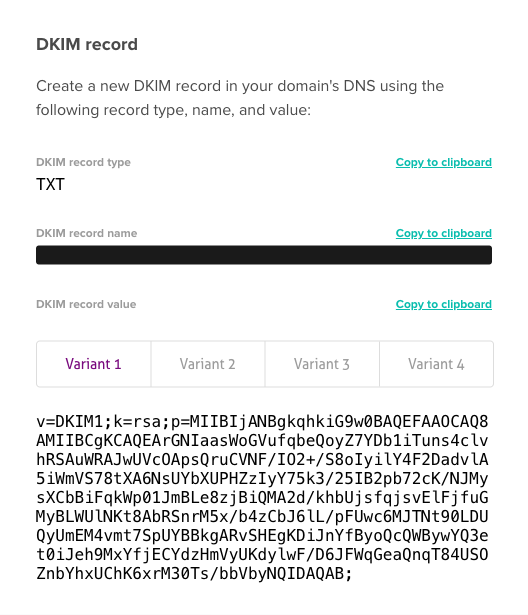
Add the DKIM record. The platform shows you a DKIM record to create in your DNS:
- Type:
TXT - Name and Value: use the Copy to clipboard buttons to copy the exact values shown for your domain. Don't retype them; a single extra space or character will stop it from working.
- For the value, the platform offers four variants. Variant 1 covers the majority of cases, so copy Variant 1. If your domain is still not verified after the records have propagated, contact our Support team, who can tell you whether another variant suits your setup.
- If your DNS tool only accepts a prefix (for example
..._domainkeyinstead of the full..._domainkey.yourdomain.com), that's fine, and our system evaluates the complete record automatically.
- Type:
-
Make sure you have a DMARC record. The platform also checks your domain's DMARC record. If your domain doesn't have one yet, add a
TXTrecord in your DNS:- Name:
_dmarc.yourdomain.com - Value:
v=DMARC1; p=none;
- Name:
-
Wait for verification. Click Continue. DNS changes usually take a few hours to apply, and sometimes up to 24–48 hours. The platform then checks your DKIM and DMARC records.
-
Check the status. Once it's done, your domain shows as Authenticated. If it's still Unverified after 48 hours, see Troubleshooting below.
Get your account's exact records from the app
Your DKIM, DMARC, tracking, and bounce records are generated specifically for your account in Settings ▸ Domains. Open that page and use the Copy to clipboard buttons to get the precise values for your domain — don't retype them. For the full list and format, see Adding DNS records.
Authenticating more than one domain
You authenticate each domain separately. The records are different for every domain, so you can't reuse them from one domain to another.
For each new domain, just repeat the same steps:
- In Settings ▸ Domains ▸ Sender Domains, find the domain (or click Create Sender and Domain to add it).
- Click Authenticate Domain.
- Use the Copy to clipboard buttons to copy that domain's records into that same domain's DNS — don't retype them, and don't reuse another domain's records.
The only thing that stays the same is the method: same page, same steps, and always TXT records.
Strongly recommended: align your tracking and bounce domains
Authenticating your domain is the first step. To get the best deliverability, and so that links in your test emails work, you should also align your tracking and bounce domains on the same Settings ▸ Domains page. See Tracking and bounce domains.
Troubleshooting
The DKIM record won't verify
- Re-copy the Name and Value with the Copy to clipboard buttons; don't type them by hand, and use Variant 1 (it covers most cases).
- Check for extra spaces or line breaks added by your DNS tool.
- Allow up to 24–48 hours for DNS changes to propagate, then check again.
- If it still won't verify, contact our Support team with a screenshot of the records you entered.
DNS changes don't seem to take effect
- Confirm you saved the record in your DNS provider's panel.
- Some providers cache changes; wait, then re-check.
- Make sure the record Type is exactly
TXT.
My domain is authenticated but emails still go to spam
- Authentication is one factor; your content, list quality, and reputation matter too.
- See Building sender reputation and Mastering deliverability basics.
Related articles
- Adding a sender - Set up your "From" address
- Tracking and bounce domains - Brand your links and bounce handling
- Building sender reputation - Why authentication matters
- Fixing emails going to spam - Next steps after authenticating
- First steps - Initial account setup